Showing posts with label September DT Kit. Show all posts

Monday, September 24, 2012

My 2nd Tutorial for Scrapbook Studio

No wonder I have been feeling grim!! I finally went to the doctor on Saturday, and he diagnosed me with bronchitis. I have been man down all weekend!!!!

So... hence the delay in getting this tutorial up. Better late than never I say. 

I hope my South African friends are all enjoying the long weekend, and have braaied up a storm today. My hubby braaied us some delicious meat, just what the doctor ordered ;)

So here is the second layout I created with the September kit from Scrapbook Studio. I am so happy with the way this one turned out!!


STEP 1:
I gather all the elements I want to use on my page. In this instance I changed the color of my photos to black & white, as they didn’t match the patterned papers I want to use. I do this fairly often! I am doing a sports themed page, so I grabbed both the lovely “teresa collins” stamps included in the kit.


STEP 2:
I spray some Mister Huey’s Color Mist in the color Leaf Green onto a piece of cream cardstock, I like the effect of spraying mist onto plain cardstock, it gives it a bit of life!
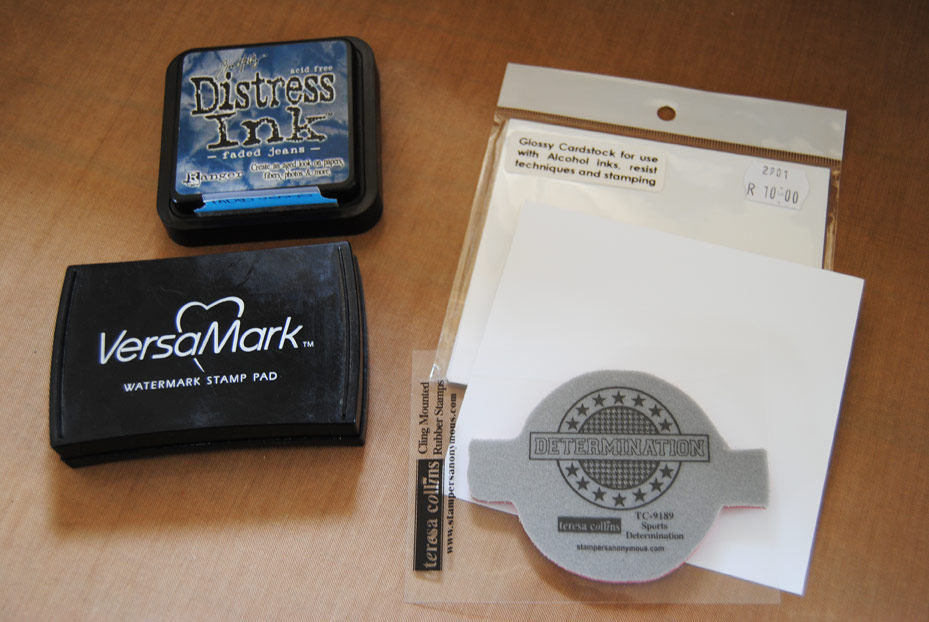


STEP 3:
I decided to make some embellies from the stamps. I used some of the Glossy Cardstock that came with the kit. This is the first time I have embossed and used Tim Holtz distress ink with this cardstock, and it goes on like a dream!!


STEP 3:
I stamp the image with VersaMark ink, and then add white embossing powder. Here is the image before I have heated it.


Here is the image after I have heated it. I don’t have a fancy heating gun, so I just use my toaster to heat the image.


STEP 4:
Sponge some Distress Ink onto the image. I used the Tim Holtz Distress ink in the color “Faded Jeans”.


STEP 5:
Cut out the image. I followed the same procedure with the other “Teresa Collins” stamp in the kit. I plan to pop up both the stamped images with foam tape!


STEP 6:
I fiddle with my photos and other elements until I find a layout I am happy with. I cut out some of the lovely card images from the “Cheer ‘em on” paper from Webster’s Pages, using pieces with blue in them so I can add a little bit of blue to co-ordinate with the blue stamped images!! I use my Silhouette Cameo to cut out the word “athletics”, arrow and the stars. 


A side-on view so you can see how lovely the popped up embossed stamped embellies look on my layout!!


This really is the most wonderful kit, and I still have LOADS AND LOADS of product left after creating these last 2 pages. 

REMEMBER - This kit can be ordered by just e-mailing sales@scrapbookstudio.co.za with September DT kit in the Subject Line.

I will be back with another Scrapbook Studio tutorial soon!! 

Smiles,


Tuesday, September 18, 2012

My 1st tutorial for Scrapbook Studio

I recently received my kit from Scrapbook Studio, and was delighted with the lovely goodies included in my package. This is the September kit, and is ideal for those with sporty kids in the family!!!! I created my first tutorial with some of the lovely goodies, check it out!!!


STEP 1:
Position stencil. I placed mine in the left hand corner. Be careful to cover all the rest of your cardstock so as not to get mist all over. I used Studio Calico Mr Huey’s Color Mist in the colour Opaque White.


In hindsight I realize I should have positioned the stencil slightly more to the right!


STEP 2:
Gather the elements from your kit that match with your photos. I am going to use this series of photos of my youngest son riding his bicycle for my layout, hence the bicycle stencil. I want to use the large arrow in my title. I used a free Photoshop action called CoffeeShop Denim to alter my photos and bring out more blue in them.


STEP 3:
Cut out your photos and arrange all your elements in the following design, or any other that may better suit your photos. I kept my layout pretty simple so that the photos and bold bicycle misted shape would be the main focus of my page.


STEP 4:
Add more embellishments to your layout as desired. I chose to use the bold red paper in the kit to cut out the word “rider” as well as the arrows. I used my Silhouette Cameo to do this. I also added some stamped circles in white.


STEP 5:
This is just something I do personally. After arranging the layout as I would like it, I take a photo with my phone so I can remember the exact position of each element, so I can stick it all down correctly.


STEP 6:
I add some straight stitching with my sewing machine. I often sew on my layouts as I love the homely effect it gives my page, as well as extra texture. I did a bit of free hand stitching along the side of each semi-circle.


STEP 7:
I totally love this old typewriter which I bought on auction. If you notice on most of my layouts I love to do my journaling in strips, and the old font and effect I get from the typewriter is just perfect for me. I type out my journaling and then cut into strips and adhere to my layout. Here is the end result!!


I totally love the way this layout turned out. 

REMEMBER - This kit can be ordered by just e-mailing sales@scrapbookstudio.co.za with September DT kit in the Subject Line. For more info of  other product available, PLEASE stop by SCRAPBOOK STUDIO to see their lovely range of scrapping goodies!!!!!

Smiles,


P.S. I am on 299 Followers, only 1 more and than I make 300. Please if you like what you see can you join my Followers group :)